installfest
💻 macOS Installfest
Pre-install
- Identify which version of OSX you’re using - ideally you should have Ventura or newer (13.3.x)
- Ensure that you’ve uninstalled any antivirus software you may have, as it can prevent some of the tools from installing properly
Install Xcode Command Line Tools
Xcode is a large suite of software development tools and libraries from Apple.
The Xcode Command Line Tools are part of Xcode. Installation of many common Unix-based tools requires the GCC compiler.The Xcode Command Line Tools include a GCC compiler.
-
Open terminal an type
xcode-select --install - You’ll see a panel that asks you to install Xcode Command Line Tools.
- Click ‘Install’ to begin the download and installation process.
Terminal
- Install iTerm2
- Set the font size to be 14pt
- Press ⌘ + ,
- Navigate to Profiles > Text > Font
- Increase the font size
Text editor
Zed
Zed Zed is a next-generation code editor designed for high-performance collaboration with humans and AI, written in Rust 🦀.
- Download Zed
- Move the app from downloads folder to application folder
- Open Zed
- Open the settings with ⌘ + ,
- Copy and paste the contents of this
settings.jsonfile into the settings - Install the CLI integration by press
Zed > Install CLI Integration
Agent Skills
Agent Skills are reusable instruction packages the AI agent loads on demand. Zed reads them from ~/.agents/skills/, Claude Code reads them from ~/.claude/skills/. This installfest puts the canonical set at ~/.agents/skills/ and symlinks ~/.claude/skills/ to it so both tools see the same skills.
This requires the Claude CLI (set up later in this installfest); if you have not installed it yet, do that first and come back.
-
Register the two extra plugin marketplaces:
claude plugin marketplace add accesslint/claude-marketplace claude plugin marketplace add anthropics/skills -
Install the Claude Code plugins listed in
configs/skills/claude-plugins.txt:xargs -L1 claude plugin install < configs/skills/claude-plugins.txtfirebase@claude-plugins-officialships in the list. Disable it from the Claude UI if you do not need it. -
Install the custom subagent:
mkdir -p ~/.claude/agents cp configs/skills/agents/code-challenge-reviewer.md ~/.claude/agents/ -
Create the shared skills directory and symlink
~/.claude/skills/to it:mkdir -p ~/.agents/skills ln -sfn ~/.agents/skills ~/.claude/skillsln -sfnoverwrites any existing~/.claude/skills/entry. If you already have skills there from another setup, back them up first. -
Copy the vendored skill bundles into the shared directory:
cp -R configs/skills/bundles/* ~/.agents/skills/ -
Sparse-clone the curated subset of the Anthropic skills registry listed in
configs/skills/anthropic-skills.txt:git clone --filter=blob:none --sparse https://github.com/anthropics/skills /tmp/anthropic-skills git -C /tmp/anthropic-skills sparse-checkout set $(sed 's|^|skills/|' configs/skills/anthropic-skills.txt | tr '\n' ' ') while read -r skill; do cp -R "/tmp/anthropic-skills/skills/$skill" ~/.agents/skills/ done < configs/skills/anthropic-skills.txt rm -rf /tmp/anthropic-skills -
Verify. Open Zed and type
/in the agent panel — your installed skills should appear in the completion menu. Optional CLI sanity checks:claude plugin list readlink ~/.claude/skills # should print the path to ~/.agents/skills ls ~/.agents/skills # should list all installed skill folders ls ~/.claude/agents # should include code-challenge-reviewer.md
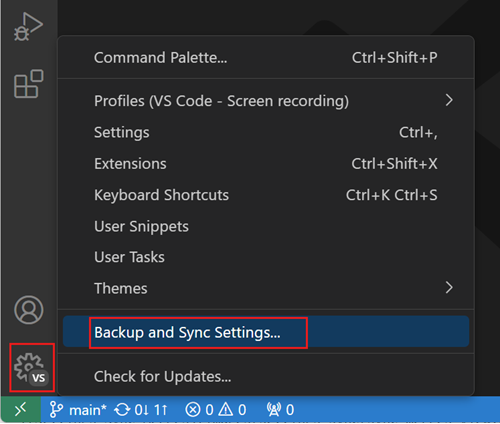
VS Code
Visual Studio Code is a lightweight but powerful source code editor which runs on your desktop and is available for Windows, macOS and Linux. It comes with built-in support for JavaScript, TypeScript and Node.js
- Download Visual Studio
- Move the app from downloads folder to application folder
- Open Visual studio
- Install CLI integration
- Press ⌘ + Shift + P
- Type
Shell Command: Install 'code' command in PATHand press Enter
-
Turn on Settings sync
Terminal theme
-
Create file called
one-dark.itermcolorson the~/Desktopand open itzed ~/Desktop/one-dark.itermcolors - Copy and paste One Dark theme code into the file
- Set the theme
- Press ⌘ + ,
- Navigate to Profiles > Colors > Color presets…
- Select one-dark
Homebrew Package Manager
Homebrew is a package manager for macOS Linux.
What are packages?
Packages are bundles of source code distributed by developers of software, which can be compiled and installed on your machine.
Install
- The package manager allows us to install and update software (like Ruby, Git, MongoDB, etc) from the command line:
- Open http://brew.sh/, scroll down to Install Homebrew and copy+paste the command into the terminal.
- Ensure that Homebrew is raring to brew and fix any issues:
brew doctor - Update Homebrew:
brew update
(Note: the absolute paths will not be used after the next step, but might not be needed if they already have /usr/local/bin in their $PATH)
Fish Shell
-
Install Fish shell
brew install fish -
Add the shell to
/etc/shellswithecho $(which fish) | sudo tee -a /etc/shells -
Change the default shell to Fish
chsh -s $(which fish) -
Configure iTerm to use Fish shell
- Open iTerm
- Press ⌘ + ,
- Navigate to Profiles > General > Command
- Select Command
Login Shell - Check
Load integration automatically
Install Fisher plugin manager
Run the following command to install Fisher:
curl -sL https://raw.githubusercontent.com/jorgebucaran/fisher/main/functions/fisher.fish | source && fisher install jorgebucaran/fisher
Install Bass plugin
Bass makes it easy to use utilities written for Bash in fish shell.
fisher install edc/bass
Install onedark-fish theme
fisher rkbk60/onedark-fish
Configure Fish shell
-
Create a file called
config.fishin the~/.config/fishdirectoryzed ~/.config/fish/config.fish -
Add the following to the file
if status is-interactive
   # Commands to run in interactive sessions can go here
   fish_add_path /opt/homebrew/bin
   set_onedark
end

# Homebrew
export HOMEBREW_PREFIX="/opt/homebrew"

# set editor
export EDITOR='zed -w -n'
export PAGER='less -f'
Install Starship 🚀
-
Type
brew install starship -
Add following to
~/.config/fish/config.fishif status is-interactive # ... other commands starship init fish | source end -
To get started configuring starship, create the following file:
~/.config/starship.toml# Don't print a new line at the start of the prompt add_newline = false # Disable the package module, hiding it from the prompt completely [package] format = "via [🎁 $version](208 bold) " [git_branch] symbol = "🌱 " [nodejs] format = "via [🤖 $version](bold green) " [directory] truncation_length = 8 truncation_symbol = "…/" [docker_context] format = "via [🐋 $context](blue bold)" [kotlin] symbol = "🅺 " [kubernetes] format = 'on [🐳 $context \($namespace\)](bold green) ' disabled = false [rust] format = "via [⚙️ $version](red bold)" [sudo] style = "bold green" symbol = "👩💻 " disabled = false [terraform] format = "[🏎💨 $workspace]($style) "
Install Bat 🦇
A cat(1) clone with syntax highlighting and Git integration.
- Type
brew install bat
Install pyenv Python Version Manager
pyenv lets you easily switch between multiple versions of Python.
-
Install
brew install pyenv brew install pyenv-virtualenv - Set up your shell environment for Pyenv, run this
set -Ux PYENV_ROOT $HOME/.pyenv fish_add_path $PYENV_ROOT/bin -
Set up shell environment for Pyenv in
~/.config/fish/config.fish# Load pyenv pyenv init - | source alias brew="env PATH=(string replace (pyenv root)/shims '' \"\$PATH\") brew" - Restart the shell
exec "$SHELL"
Install Python
Check the latest python version and replace the semver number
- Install
pyenv install 3.11.1 - Set the global version
pyenv global 3.11.1 - Python doesn’t ship with the most up to date version of package manager pip, so upgrade pip
pip install -upgrade pip
NVM Node Version Manager
Install
-
Open a terminal window and type:
Check the latest nvm
curl -o- https://raw.githubusercontent.com/nvm-sh/nvm/v0.40.1/install.sh | bash -
Type
source ~/.nvmrcto include the new folders to the current$PATH
Deeper shell integration
Read more here
- Create the following fish functions
# ~/.config/fish/functions/nvm.fish
function nvm
  bass source ~/.nvm/nvm.sh --no-use ';' nvm $argv
end

# ~/.config/fish/functions/nvm_find_nvmrc.fish
function nvm_find_nvmrc
  bass source ~/.nvm/nvm.sh --no-use ';' nvm_find_nvmrc
end

# ~/.config/fish/functions/load_nvm.fish
function load_nvm --on-variable="PWD"
  set -l default_node_version (nvm version default)
  set -l node_version (nvm version)
  set -l nvmrc_path (nvm_find_nvmrc)
  if test -n "$nvmrc_path"
    set -l nvmrc_node_version (nvm version (cat $nvmrc_path))
    if test "$nvmrc_node_version" = "N/A"
      nvm install (cat $nvmrc_path)
    else if test "$nvmrc_node_version" != "$node_version"
      nvm use $nvmrc_node_version
    end
  else if test "$node_version" != "$default_node_version"
    echo "Reverting to default Node version"
    nvm use default
  end
end
- Invoke on
~/.config/fish/config.fishby
if status is-interactive
    # ... other commands
    load_nvm > /dev/stderr
end
Using NVM
-
Now that nvm is installed, we want to list the available versions, type:
nvm ls-remote- And you will be shown a list of all the available versions of node
- Install the latest version of node and the current Long term support (LTS)
nvm install node nvm install --lts -
Check that Node is installed, type
node --version- You should see the last version number that you’ve installed
- To use
nvm useautomatically in a directory with a.nvmrcfile add
Install PNPM
Since v16.13, Node.js is shipping Corepack for managing package managers.
-
Enable corepack
corepack enable -
Install pnpm
corepack prepare pnpm@latest --activate - Configure PNPM to work globally
pnpm setup -
Add the following to
~/.config/fish/config.fish# pnpm set -gx PNPM_HOME "/Users/pataruco/Library/pnpm" if not string match -q -- $PNPM_HOME $PATH set -gx PATH "$PNPM_HOME" $PATH end # pnpm end
Biome
Install Biome
brew install biome
Prettier
Create .prettierrc.json file
- Let define some rules for
prettier
zed ~/.prettierrc
-
Copy and paste this configuration
-
Save file command + S.
Install prettier packages
Install the following prettier packages
pnpm --global add prettier
Install Rust 🦀
Just run this
curl --proto '=https' --tlsv1.2 -sSf https://sh.rustup.rs | sh
Install Git
Git is the version control system that we will use throughout the course. It is one of the most powerful tools you will use as a developer.
- This ensures we can upgrade Git more easily:
brew install git - Restart the terminal
- Ensure you’re not using “Apple Git” from the path
/usr/bin/gitby checkingwhich gitandgit --version - Configure your name and email address for commits (be sure to use the email address you have registered with Github):
 git config --global user.name "Your Name"
 git config --global user.email "you@example.com"
Git Multiple identities
Instead to have a global user email, we can set a different identity per repo.
- Reset global user email
git config --global --unset-all user.email -
Set local config per repo
git config --global --add user.useConfigOnly true - Add email to your GitHub account emails
-
Before the first commit on repo
git config --local --add user.email mail@example.com
Git set default branch to be main
git config --global init.defaultBranch main
git show plugin (Delta)
Delta provides language syntax-highlighting, within-line insertion/deletion detection, and restructured diff output for git on the command line.
- Install via brew
brew install git-delta -
Configure git to use delta adding the following to
.gitconfig:[core] pager = delta [interactive] diffFilter = delta --color-only [delta] features = side-by-side line-numbers decorations whitespace-error-style = 22 reverse [delta "decorations"] commit-decoration-style = bold yellow box ul file-style = bold yellow ul file-decoration-style = none
git-clean
Based on # Git Remove tracking branches no longer on remotE https://stackoverflow.com/a/33548037/4842303
-
Create a fish file function
zed ~/.config/fish/functions/git_clean.fish -
Add the following function
function git-clean
 git fetch -p
 for branch in (git for-each-ref --format '%(refname) %(upstream:track)' refs/heads | awk '$2 == "[gone]" {sub("refs/heads/", "", $1); print $1}')
   git branch -D $branch
 end
end
Global .gitignore
There are a few files that we don’t want Git to track. We can specifically ignore them by adding the files to a global .gitignore file.
.DS_Store files
.DS_Store files are used by Mac OS X to store folder specific metadata information. They are different for every mac, it means that they often cause conflicts in version controlled folders.
Since we never want to track .DS_Store files, we can make a global .gitignore file, and tell git to use it for all repositories:
echo .DS_Store >> ~/.gitignore_global
git config --global core.excludesfile ~/.gitignore_global
public/uploads/, node_modules & bower_components
In the same way, we want to never track the contents of our uploads folder in Rails (which usually contain images or media that we have uploaded during testing) or our node_modules or bower_components.
echo "/public/uploads/\nnode_modules/\nbower_components/" >> ~/.gitignore_global
autocorrect
Enable auto-correct the suggested command will run after a short delay to give you the chance to cancel the command if it is not what you intended
git config --global help.autocorrect 20
Configure SSH keys on Github
GitHub is a web-based Git repository hosting service. It allows us to keep a remote version of our version-controlled projects. When we push and pull from Git, we don’t want to always have to login to verify who we are. Therefore, what we can do is generate and use something called an SSH key. SSH keys are a way to identify trusted computers, without involving passwords.
- First, we need to check for existing SSH keys on your computer. Open up your Terminal and type:
ls -al ~/.sshCheck the directory listing to see if you have files named either id_rsa.pub or id_dsa.pub. If you have either of those files you can skip to the step ‘add your SSH key to Github’.
- Generate a new SSH key
ssh-keygen -t rsa -C "your_email@example.com" - You’ll be prompted for a file to save the key, and a passphrase. Press enter for both steps (default name, and no passphrase)
- Then add your new key to the ssh-agent:
ssh-add ~/.ssh/id_rsa - Add your SSH key to GitHub by logging into Github, visiting account settings and clicking SSH keys. Click Add SSH key
- Copy your key to the clipboard with the terminal command:
pbcopy < ~/.ssh/id_rsa.pub - On Github, create a descriptive title for your key, an paste into the
keyfield - do not add or remove and characters or whitespace to the key - Click
Add keyand check everything works in the terminal by typing:ssh -T git@github.com
Configure signed commits
- Copy your key to the clipboard with the terminal command:
pbcopy < ~/.ssh/id_rsa.pub - On Github, create a descriptive title for your key, an paste into the
keyfield - do not add or remove and characters or whitespace to the key - Select the type of key to be
Signing Key. - Click
Add key - Configure Git to use SSH to sign commits and tags
git config --global commit.gpgsign true git config --global gpg.format ssh - To set your SSH signing key in Git with the path to the public key you’d like to use.
git config --global user.signingkey ~/.ssh/id_rsa.pub
Speed up your cursor
During the course, we will be doing a lot of navigating using our keyboards. By default, the speed of the curson on a Mac is a little too slow. Let’s increase the speed of the cursor by going to:
System Preferences > Keyboard
Move both up to maximum.